Archive for the ‘SharePoint’ Category
Using EF Code First 4.1 to persist data from an InfoPath form
In this article, I am going to demonstrate how to submit an InfoPath form to a web service, and persist data to a database using EF Code First 4.1.
To complete this tutorial, you must have Entity Framework 4.1 installed on your machine.
You can get it here Entity Framework 4.1
Or via nuget : PM> Install-Package EntityFramework
1.Design your InfoPath form
The first step of this tutorial is to design your form using InfoPath designer. I’m not going to detail it.
Here is my basic form for the purpose of this article. It allows you to enter personal details of a person (First, last name, Job title) and several addresses (Street name, Post code, City) using a repeating section.
Tip: rename Fields and group properly, from this will be generated your model.
That’s it for the design.
2. Export the XSD file from your InfoPath form
Each InfoPath file is actually a bunch of files that are packaged together. One of them, the xml schema definition (XSD) file, interests us.
From this file, we are going to generate .NET classes that will model our data.
First export the files in a folder of your choice. To do so: File -> Publish -> Export Source Files
Go to the folder where you extracted the files and locate the myschema.xsd.
3. Generate the classes from the XSD file
To generate the classes, we are going to use xsd.exe tool. It will parse the xsd file and generate the corresponding classes.
Using the “Visual Studio Command Prompt (2010)” from the start menu:
Navigate to the directory where you extracted the InfoPath files and type the following command line:
xsd myschema.xsd /classes /language:cs /namespace:InfoPathContactForm
- myschema.xsd: the file from InfoPath.
- /classes: Generate classes for this schema.
- /language:cs: The language to use for the generated code. Here C# (the default).
- /namespace:InfoPathContactForm: The namespace for generated class files. Here InfoPathContactForm.
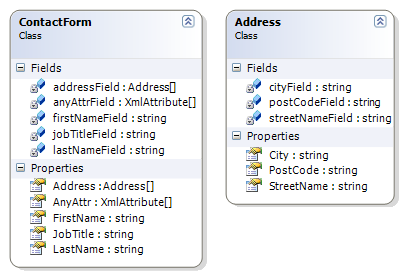
The result of this command is the myschema.cs file that contains the classes that model our data of the InfoPath form.
The class diagram of the myschema.cs
4. Create the Web Service project
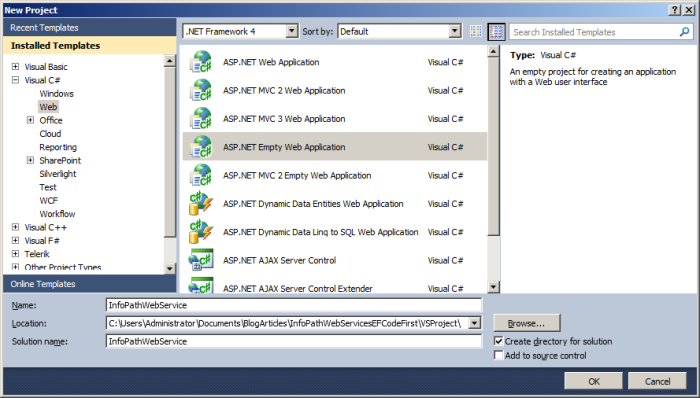
Let’s move now to Visual Studio and create a new project:
- File -> New -> Project
- Select .NET Framework 4, ASP.NET Empty Web Application.
- Give it a name
- Click OK
Now add the Web Service File to your solution.
- Right click the project in the solution explorer
- Click Add -> New Item
- Select “Web Service”
- Give a name (I call mine ContactFormWebService.asmx)
- Click Add.
Add the myschema.cs file generated by the xsd tool at the previous step to the project:
- Right click the project in the solution explorer
- Click Add -> New Existing Item
- Select the myschema.cs file.
- Click Add
To use EF code first, you will also need to add the following references to your project:
- EntityFramework
- System.Data.Entity
- System.ComponentModel.DataAnnotations
Your project should now look like this in the project explorer:
5. Code the Web Service
Open the ContactFormWebService.asmx.cs code behind file. Remove the sample HelloWorld() web method.
Add a web method that will be called on form submission. This method will receive one parameter as entry of type ContactForm (the type that has been generated using the xsd tool).

Compile, and run in debug (F5)
And copy the Web Service url from your browser
6. Connect InfoPath form to the web service
To connect our InfoPath form to a web service:
- Click on File -> Submit option -> To Web Service.
- And follow the wizard:
- Step 1: Paste the url of the web service (here http://localhost:50760/ContactFormWebService.asmx )
- Step 2: Select the submit method
- Step 3: Map the parameter of the web method as shown here

- Step 4: Finish
Now your form is connected to the web service, when you will submit the form, the web method will be called.
7. Persist Data to DB using EF Code First 4.1
You usually start your EF coding by writing the classes of your model. The interesting point here and that will save us a lot of efforts; is that we already have those classes as xsd tool generated them at step 3.
Here are the classes:
As you can see the classes are rather clean. However, they still require some customization:
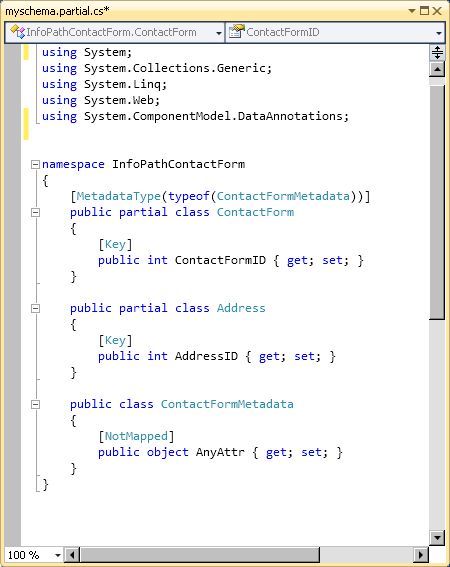
First, we do not want to have the property “ContactForm.AnyAttr” in our database. We will need to decorate it with the [NotMapped] attribute.
Secondly, there are no primary keys defined for the classes, we will need to introduce some.
But you will not want to makes the changes directly to the generated classes, as the comment at the top of the myschema.cs kindly reminds you:
// <auto-generated>
// This code was generated by a tool.
// Runtime Version:4.0.30319.235
//
// Changes to this file may cause incorrect behavior and will be lost if
// the code is regenerated.
// </auto-generated>
We are going to do, is to create a separate file with partial classes ContactForm and Address.
Let’s add a new class file to our project:
- Right click the project in the solution explorer
- Click Add -> New Item
- Select “Class”
- Give a name (I call mine myschema.partial.cs)
- Click Add.
Write two partial classes inside the code file:
public partial class ContactForm
{
}
public partial class Address
{
}
First we are going to add the attribute [NotMapped] to the property AnyAttr as this property is in the other part of the partial class and that we cannot edit it, we are going to use the a MetadataType.
We create a new class for the metadata, call it ContactFormMetadata. It will contain one public object property called AnyAttr; we will decorate it with [NotMapped] attribute.
public class ContactFormMetadata
{
[NotMapped]
public object AnyAttr { get; set; }
}
At the compilation time, this attribute will be applied to the actual AnyAttr property of the ContactForm class. For this to work, you need to tell the ContactForm class to look at the ContactFormMetadata class to get the attributes. Do this by decorating the ContactForm class with[MetadataType(typeof(ContactFormMetadata))]
Let’s add now the primary keys and your file myschema.partial.cs should look like:

Create a new class InfoPathFormDbContext that derives from System.Data.Entity.DbContext, and exposes a typed DbSet<TEntity> for ContactForm and Address classes:
- Right click the project in the solution explorer
- Click Add -> New Item
- Select “Class”
- Name it InfoPathFormDbContext
- Click Add.
public class InfoPathFormDbContext: DbContext
{
public DbSet<ContactForm> ContactForms { get; set; }
public DbSet<Address> Addresses { get; set; }
}
Then use the InfoPathFormDbContext in your web method to save the form:
[WebMethod]
public void Submit(ContactForm form)
{
using (InfoPathFormDbContext db = new InfoPathFormDbContext())
{
db.ContactForms.Add(form);
db.SaveChanges();
}
}
Compile, Run and Give it a try…
Fill the form first.
Submit it.
And have a look in your database…
SharePoint 2010 Development Environment
Here is my SharePoint development environment configuration set up in a virtual machine:
- Windows Server 2008 R2 Enterprise 64bits SP1
- Domain name: dev.internal
- Machine name: sp2010
- Visual Studio 2010 Premium SP1
- Visual C#
- Visual Basic .NET
- Microsoft Office Professional Plus 2010 64 bits SP1
- Microsoft SharePoint Designer 2010 64 bits
- Microsoft SQL Server Enterprise 2008 R2 64 bits
- Analysis Services
- Reporting Services
- Microsoft SQL Server Management Studio
- Microsoft SharePoint Server 2010 Enterprise
- Windows PowerShell ISE
For productivity purpose I have tuned the following settings:
- Shut down tracker disabled
- “14” environment variable pointing to “C:\Program Files\Common Files\Microsoft Shared\Web Server Extensions\14”
- “C:\Program Files\Common Files\Microsoft Shared\Web Server Extensions\14\BIN” added to PATH
- Central admin address: http://sp2010:40000


